
Now that you’re living on your own, you can continue family traditions or begin new ones, like Easter egg decorating. Well before Easter arrives, you’ll find entire aisles at your grocery store loaded with kits and Easter egg decorating supplies.
Whether you choose to buy an Easter egg decorating kit or get creative with your own materials, you’ll also need to have these supplies on hand:
Just before you start, you’ll also need to boil enough water to fill the cups.
Hard boil your eggs the day before and keep them refrigerated until an hour or so before you’re ready to begin. Using a paper towel dipped in vinegar, wipe the eggs so the dye will adhere evenly to the surface. Return eggs with cracked shells to the fridge and use those to make egg salad or deviled eggs.
Kits include dye tablets that you drop into a cup filled with boiling water and stir to dissolve the tablet. They typically include at least four colors — red, yellow, green and blue — but check the box to see how many there are in your kit. Most kits will dye up to two dozen eggs.
If you don’t use a kit, you can find food coloring in the spice section of your local grocery store. Boxes can have anywhere from four to eight bottles of food coloring you can blend to make additional colors — there are even neon options. Some food coloring manufacturers offer egg decorating kits, so keep an eye out for those. If you prefer, you can make homemade dyes from blueberries, turmeric, paprika, raspberries and coffee grounds.
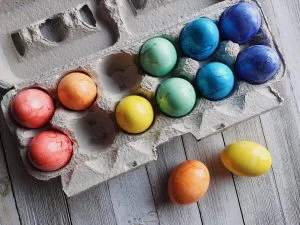
No matter which colors you use, the longer eggs stay in the dye, the deeper their shades will be. When it comes to multiple colors, a general rule of thumb is to use hues next to each other on a color wheel.
Kits come with one or two wired “egg dippers” for lowering and removing your egg. If friends and family are decorating eggs with you, it can help to have extra spoons or tongs to keep things rolling. Raid your utensil drawer and pull out slotted spoons and tongs you don’t mind dunking in the dye. These will be better for smaller hands.
The kit’s box has punch outs you remove to make a place for your eggs to sit and dry. Be aware that the carton can become soggy and your egg may topple over like Humpty Dumpty, spoiling your efforts. Try using wire cooling racks — making sure the eggs don’t roll off — or paper towels covered in plastic wrap. The key is to turn them to keep them from sticking and dry all the way around.
Some kits include yarn, string or rubber bands you can apply to the egg before dipping that reveal a neat design when removed. They may come with a wax pencil or a few crayons for you to draw designs on your eggs. They may include glitter to put on the egg while it’s wet, and stickers of animated characters, symbols and words to apply when the egg is dry.
You can find similar things around the house to create the same effects, or try using Sharpie® markers or watercolor pencils to draw pictures or write words. Try decorating eggs with different colors using an eye dropper to control where the color goes for paint-splatter designs. You can decoupage colored eggs with magazine pictures, photos, or colored tissue paper, too.
Whether you use a kit or round up supplies, the kid in you will have fun mixing colors dreaming up designs. The Internet is full of inspiration if you want Easter egg decorating ideas for adults and kids.